
The Semantic Layer: Lets Build it
From raw schema to working semantic layer - with the pitfalls nobody warns you about

The previous five issues covered the why, the what, the which, and the design. This one covers the how.
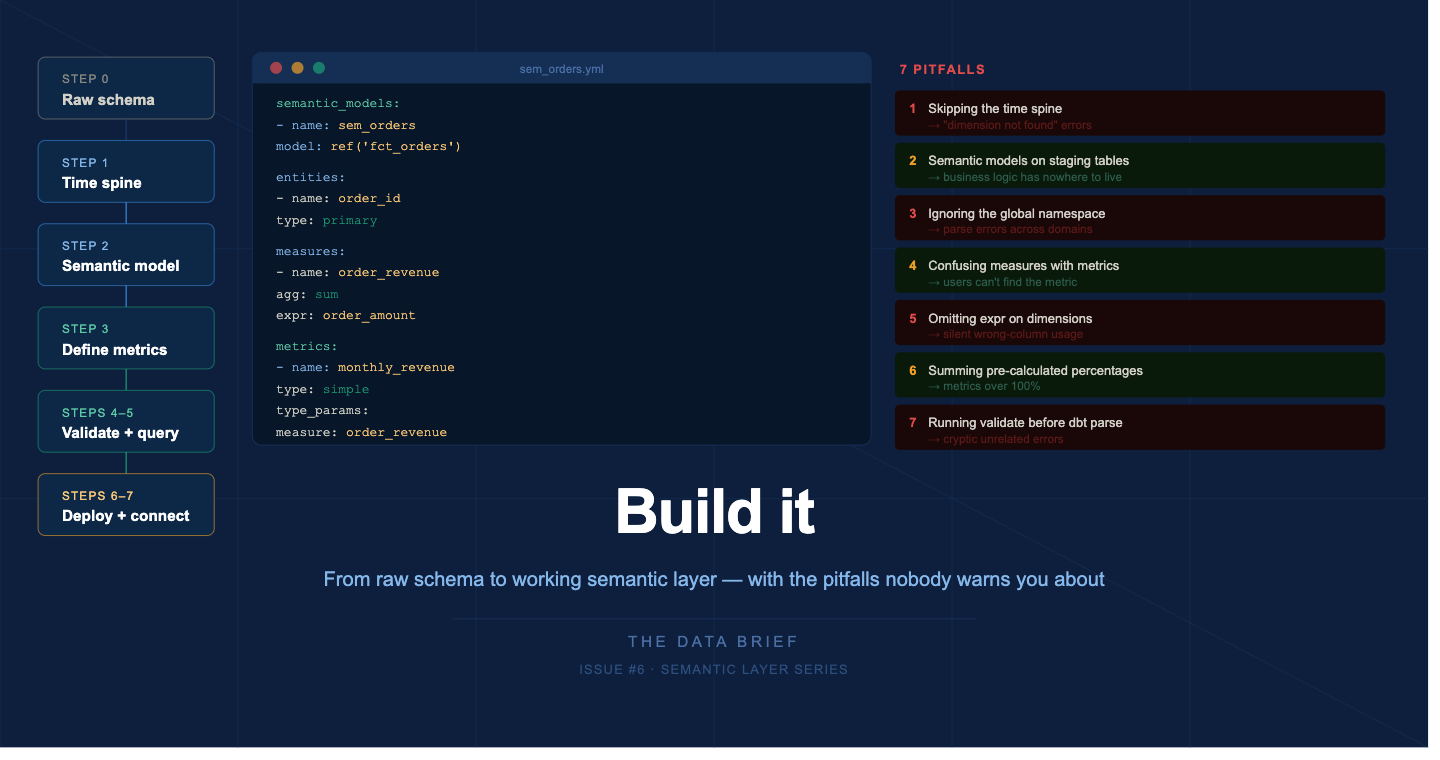
We are going to build a semantic layer on a real-world schema an e-commerce orders dataset using dbt and MetricFlow, the most common production setup in 2026. By the end you will have a working semantic model, two governed metrics, a time spine, and a validated query. More importantly, you will have encountered the mistakes that send teams back to square one - before you make them in production.
What you need to follow along
A dbt project (v1.6 or higher) connected to Snowflake, BigQuery, Databricks, or Redshift
dbt Cloud Starter plan or higher - required for Semantic Layer APIs and BI integrations
For local testing without dbt Cloud:
pip install dbt-metricflowSource data: orders, customers, products tables (Jaffle Shop-style schema)
The architecture before you write a line of YAML
Before opening any file, understand how the layers relate. This is the single most important mental model for avoiding errors later.
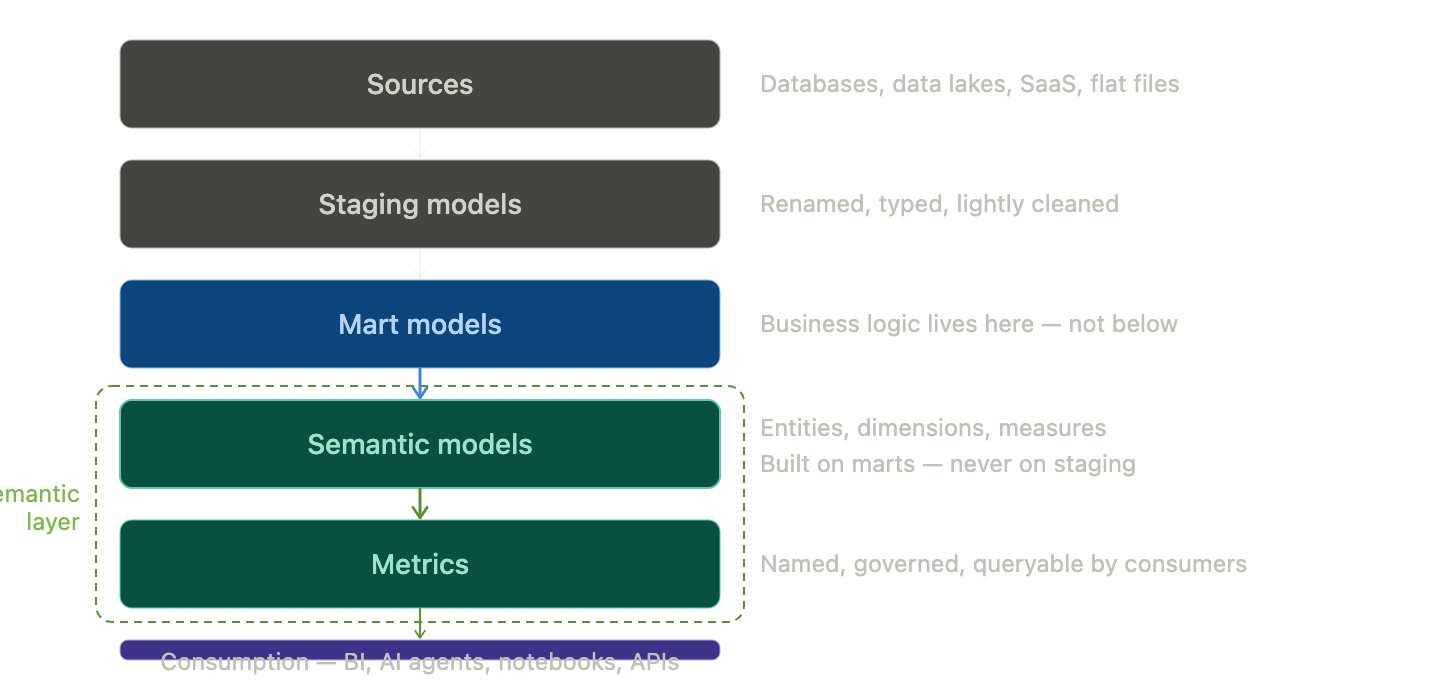
The semantic layer must sit strictly above your mart models. Never build semantic models on top of staging or raw source tables. If you do, you will eventually need mart-level business logic - filtering test orders, currency normalization, fiscal calendar alignment - and you will have nowhere clean to put it.
dbt best practice: prefer normalization when possible and allow MetricFlow to handle denormalization dynamically. Build in parallel with existing marts - never refactor production models directly. Audit the semantic layer output and deprecate old marts gracefully once definitions are validated.
Step 1 : Set up the time spine
10 min · skip this and every time-based metric fails
The time spine is not optional. Any project with time dimensions needs one. This is the most commonly missed setup step, and the error it produces - dimension not found - is not obviously connected to a missing time spine.
models/metricflow_time_spine.sql
{{ config(materialized=’table’) }}
with days as (
  {{ dbt.date_spine(
    ‘day’,
    “to_date(’2020-01-01’, ‘YYYY-MM-DD’)”,
    “to_date(’2030-01-01’, ‘YYYY-MM-DD’)”
  ) }}
),
final as (
  select cast(date_day as date) as date_day
  from days
)
select * from final
where date_day > dateadd(year, -4, current_timestamp())
and date_day < dateadd(day, 30, current_timestamp())
Scoping the spine to a reasonable window keeps the table from growing unbounded. Run dbt build to materialize the time spine before defining any semantic models.
Step 2: Define your first semantic model
20–30 min · faster once the pattern is set
models/semantic_models/sem_orders.yml
semantic_models:
  - name: sem_orders
    description: >
      Order-level fact table. One row per order.
      Excludes test orders. Uses order_date as primary
      time dimension.
    model: ref(’fct_orders’)
    defaults:
      agg_time_dimension: order_date

    entities:
      - name: order_id
        type: primary
      - name: customer_id
        type: foreign
        expr: customer_id

    dimensions:
      - name: order_date
        type: time
        type_params:
           time_granularity: day
      - name: order_status
        type: categorical
        expr: status
      - name: region
        type: categorical
        expr: customer_region

    measures:
      - name: order_revenue
        description: Gross order value excl. tax and refunds
        agg: sum
        expr: order_amount
      - name: order_count
        description: Count of distinct orders
        agg: count_distinct
        expr: order_id
Three things to get right. First: agg_time_dimension must exactly match a dimension defined as type: time. Second: always set expr explicitly on every dimension. Third: measures are private building blocks - end users query metrics, not measures.
Step 3 : Define your metrics
15 min · where business meaning lives
models/metrics/revenue_metrics.yml
metrics:
  - name: monthly_revenue
    label: Monthly Revenue
    description: >
      Total gross order revenue per month.
      Excludes cancelled orders and test accounts.
      Owned by Finance.
    type: simple
    type_params:
      measure: order_revenue
    filter: |
      {{ Dimension(’sem_orders__order_status’) }} != ‘cancelled’
    meta:
      owner: finance-data@company.com
      reviewed_at: 2026-04-29

  - name: customer_count
    label: Active Customer Count
    description: >
      Distinct customers who placed at least one order
      in the period. Excludes internal test accounts.
    type: simple
    type_params:
      measure: order_count
    meta:
      owner: analytics@company.com
      reviewed_at: 2026-04-29
Filter dimension syntax: references use the format sem_orders__order_status - two underscores between semantic model name and dimension name. Writing order_status alone causes a validation error.
The global namespace trap
dbt models are scoped - two models with the same name in different folders coexist fine. The semantic layer has no such scoping. Every entity, dimension, measure, and metric name is registered in a single global namespace across your entire project.
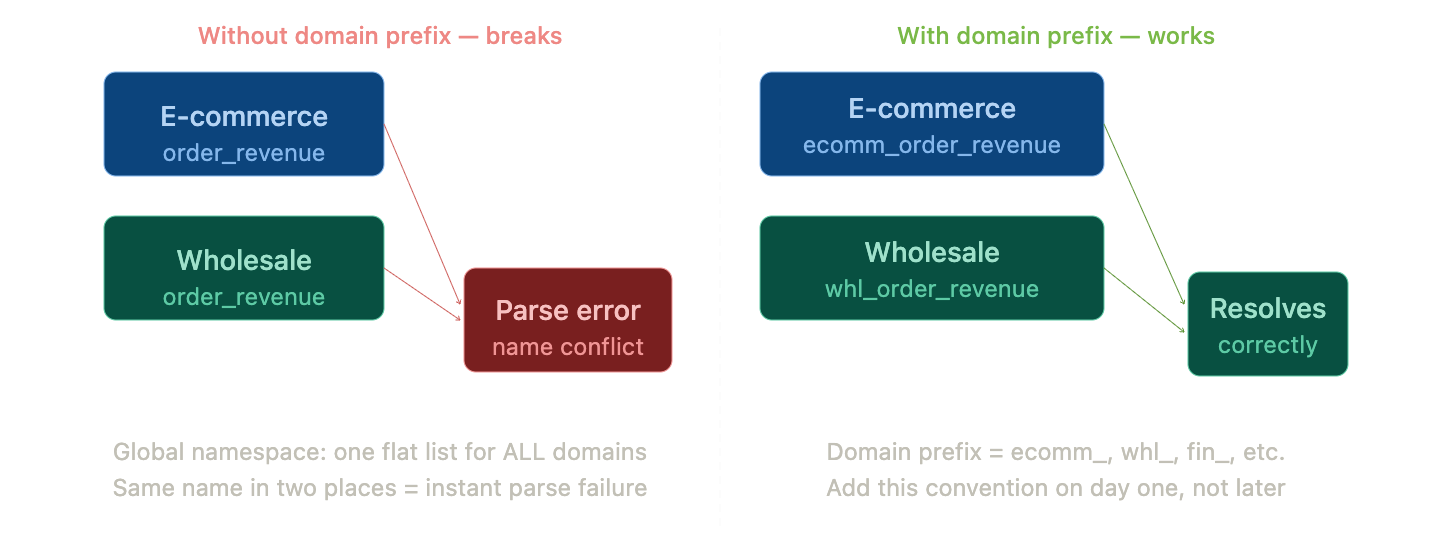
Rule: prefix everything with the domain name from day one. Use
sem_ecommerce_ordersnotsem_orders. Useecommerce_order_revenuenotorder_revenue. Document this in a README at the root of your semantic models folder.
Step 4–5: Validate, then query
10 min · always in this order
Validation sequence
# 1. Catch YAML syntax errors — no warehouse needed
dbt parse

# 2. Validate semantic models and metrics
dbt sl validate          # dbt Cloud
mf validate-configs      # dbt Core

# 3. List your metrics
dbt sl list metrics

# 4. Test dimensions for a metric
dbt sl list dimensions --metrics monthly_revenue

# 5. Run your first query
dbt sl query \
  --metrics monthly_revenue \
  --group-by metric_time__month \
  --limit 12

# Use --explain to see the SQL MetricFlow generates
dbt sl query --metrics monthly_revenue \
  --group-by metric_time__month --explain
Step 6–7
Deploy and connect your BI tool
30–60 min depending on tool
In dbt Cloud: run dbt build in your production environment, then navigate to Account Settings → Semantic Layer. Generate a service token with Semantic Layer Only permissions.
Tableau (GA): Connect → To a Server → More → search dbt Semantic Layer. Enter host URL and environment ID.
Google Sheets / Excel: Install the dbt Semantic Layer add-on from the Workspace Marketplace.
Power BI (Preview): Download the .msi installer from dbt docs. Use DirectQuery mode. Power BI Service requires an IT-configured On-premises Data Gateway.
The seven pitfalls that will cost you a week
1: Skipping the time spine
Symptom: “dimension not found” on any time-based metric
Fix: create metricflow_time_spine.sql and run dbt build first
2: Semantic models on staging tables
Symptom: business logic has nowhere clean to live
Fix: semantic models must always sit above mart layer
3: Ignoring the global namespace
Symptom: parse errors when adding a second domain
Fix: prefix all names with the domain from day one
4: Confusing measures with metrics
Symptom: analysts can’t find the revenue metric
Fix: measures are private. Only metrics are queryable by consumers
5: Omitting expr on dimensions
Symptom: wrong column used silently, or dimension not found
Fix: always set expr explicitly on every dimension
6: Summing pre-calculated percentages
Symptom: aggregated percentage metrics over 100%
Fix: store numerator and denominator; derive percentage at metric layer
7: Running validate before dbt parse
Symptom: cryptic errors that don’t point to the real problem
Fix: dbt parse always runs first
What the first week actually looks like
Day 1: Set up the time spine. Define your first semantic model on the orders mart. Validate locally. Do not touch the BI connection yet.
Day 2: Define your first two metrics. Run end-to-end queries with --explain. Share the SQL output with Finance for sanity-check before going further.
Day 3: Add naming prefixes for multiple domains. Define a second semantic model (customers). Build a ratio metric as your first cross-model metric.
Day 4: Deploy to production. Connect one BI tool. Confirm metric queries return the same numbers as your CLI output.
Day 5: Document. Every metric gets a description, an owner, a reviewed_at date, and a note on what it excludes. This is what separates a semantic layer that gets adopted from one that gets abandoned.
Do not try to migrate all your existing metrics at once. Pick two or three that matter most, define them with stakeholder sign-off, deploy, and prove value. The rest follows.
The complete series
◦ Part 1 - The semantic layer: your data’s translator
◦ Part 2 - Why now? Three forces making it unavoidable
◦ Part 3 - Which flavor fits? The decision framework
◦ Part 4 - Design your semantic model: metrics and naming
◦ Part 5 - The honest tool guide
▸ Part 6 - Build it: step-by-step walkthrough (you are here)
◦ Part 7 - Governance and access control at scale · Coming Soon
◦ Part 8 - The semantic layer in the AI era · Coming Soon
#TheDataBrief #SemanticLayer #dbt #MetricFlow #DataEngineering #AnalyticsEngineering